PFSense
INFO
PFsense on Proxmox at Hetzner Using a single IP address.
If you are using any existing firewall or iptables settings it would be worth resetting those to default and disabling any firewall on your proxmox machine. These settings could conflict with what we are about to set up.
Prepare your server
Update your server
First update your box
apt updateInstall UFW
Now we are going to install UFW
apt install ufwSet up the required interfaces
We are now going to create a few virtual bridges in Proxmox.
Click on your server under datacenter, system, networks, create, Linux Bridge.

Create 2 networks (or more, as you please).


Apply configuration.
Edit the firewall rules
Edit the UFW before.rules
nano /etc/ufw/before.rulesAdd the following to the very top of this config file
# Group name
*nat

# UFW to control both pre-routing and post-routing
:PREROUTING ACCEPT [0:0]
:POSTROUTING ACCEPT [0:0]

# Flush IP Tables
-F

# Port Forwardings
## All tcp ports except 22 and 8006
-A PREROUTING -i eno1 -p tcp -m multiport ! --dport 22,8006 -j DNAT --to-destination 10.99.99.254
## All udp ports
-A PREROUTING -i eno1 -p udp -j DNAT --to-destination 10.99.99.254

# Forward traffic through eno1 from the PFsense network
-A POSTROUTING -s 10.99.99.0/24 -o eno1 -j MASQUERADE

COMMIT
Enable port forwarding
Enable port forwarding by uncommenting the following line
nano /etc/sysctl.confnet.ipv4.ip_forward=1Apply the sysctl settings
sysctl -psysctl --systemCreate anti-lockout rules
Create rules to make sure we don't lock ourselves out
ufw allow 22/tcpufw allow 8006/tcpEnable the firewall
Now let's enable the firewall
ufw enableType "y" and then press enter to confirm.
Now enable UFW to start on boot
systemctl enable ufwMake sure that the UFW has started
systemctl start ufwsystemctl status ufwSet up default forward and outgoing rules
Now we need to set up some default allow rules to allow for outgoing and forwarding
ufw default allow outgoingufw default allow forwardNow we need to reload UFW with all the new settings and rules
ufw reloadAt this point, it would be good to reboot the server to make sure all the setting apply correctly.
rebootInstalling PFsense
Download the PFsense ISO file
https://frafiles.netgate.com/mirror/downloads/pfSense-CE-2.6.0-RELEASE-amd64.iso.gz
Unfortunately, this has to be downloaded to your PC, unzipped and then uploaded to your Proxmox server.

Create PFsense VM
https://docs.netgate.com/pfsense/en/latest/recipes/virtualize-proxmox-ve.html
In the top-right corner, click "Create VM". Give the VM a relevant name and ID number.

Move to the next tab, choose your PFsense ISO file and choose the guest OS type "other".

On the next tab, depending on personal preference, you can leave this all default. For this example, as per the PFsense documentation, we will be selecting "SPICE" for the GPU.

On the disk tab, we will be selecting "VirtIO Block" and leaving the default 32 GB as this is enough for PFsense.

For the CPU, you can select what you think is sufficient to handle 1gbit traffic. For this example, we will be using 6 cores and passing through the host CPU model.

For Memory, it is advised to use at least 1 GB or RAM. In this example, I will allow the VM to balloon RAM as needed between 4–8 GB.

For the network tab, we will be choosing the WAN interface that we created "vmbr100". We will also select the VirtIO model and make sure that the firewall is unchecked (disabled).

Click next, review the settings you have chosen, and then click finish.

Find your newly created VM in the side menu, go to hardware, add and then select "Network Device".

Here we will add the LAN interface that we created earlier. Remember to select the VirtIO model and disable the firewall option.

Starting up the VM
We can now start up the VM for the first time. Find your VM in the left panel, right click and select start. Find your way to the console and watch PFsense boot up for the first time.

Sign your life away by not reading and accepting PFsense terms and conditions

Click OK to start the PFsense installer

Continue with the default keymap

Choose the new default boot drive for PFsense (ZFS)

Select install

Since we are only using one boot disk (you can use more if you like), we will select the stripe option.

Press space bar and then enter to choose the disk

Press the left arrow key and then press enter on "yes" to confirm you are happy

PFsense will now install, it shouldn't take long!

Press enter on "No" to confirm that we do not want to open the shell

Select to now reboot PFsense to finish the installation.

You can now head to the hardware tab of the VM, choose the CD ROM by double-clicking on it, then choose to remove the PFsense ISO by selecting "Do not use any media" and then click OK to close that out.

PFsense Set Up
Now that PFsense has rebooted, it will as you a few questions. Pick no for the first question, as we do not want to set up VLAN's.

Now we are going to choose the interface we will use for WAN (vtnet0)

Now let's choose the LAN interface (vtnet1)

Then select "y" to confirm your choice
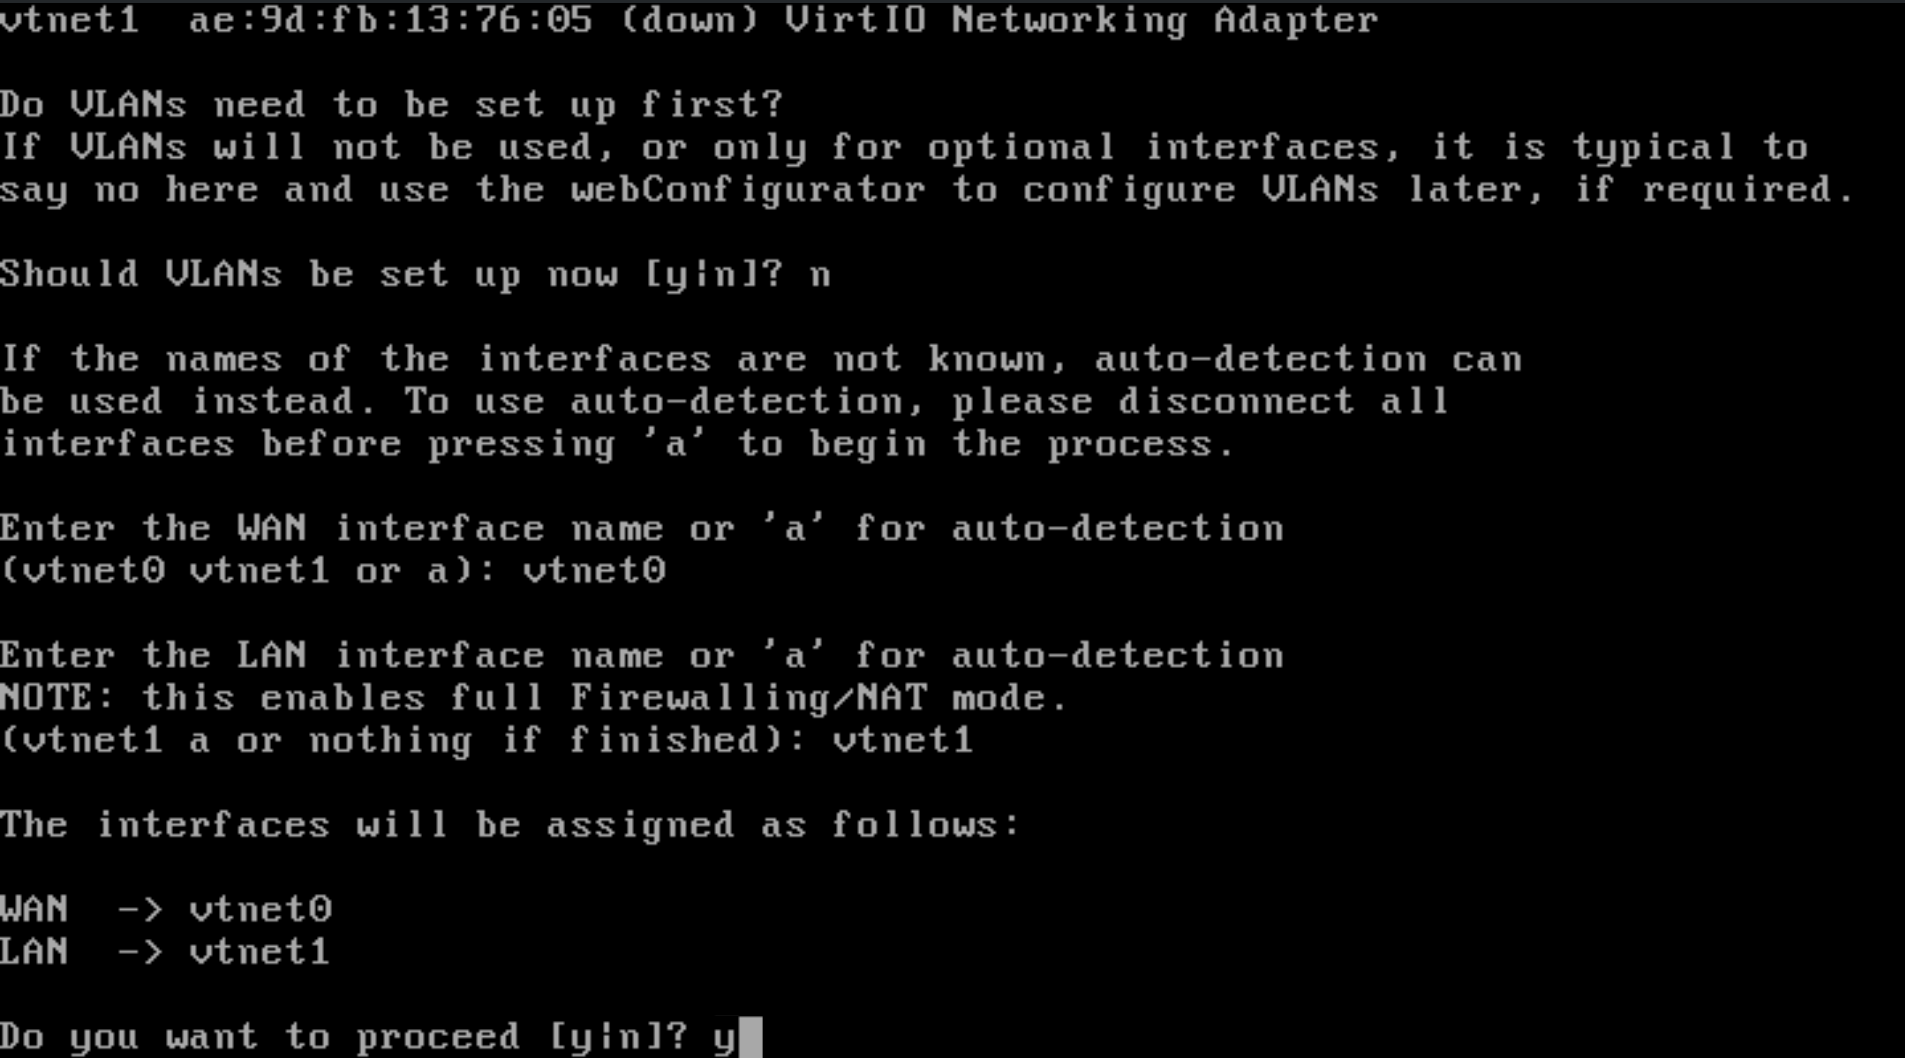
It will now configure everything for you, this can take a minute, grab a coffee

Now PFsense is fully booted up.

We are now going to assign the interface's IP address by selecting option 2
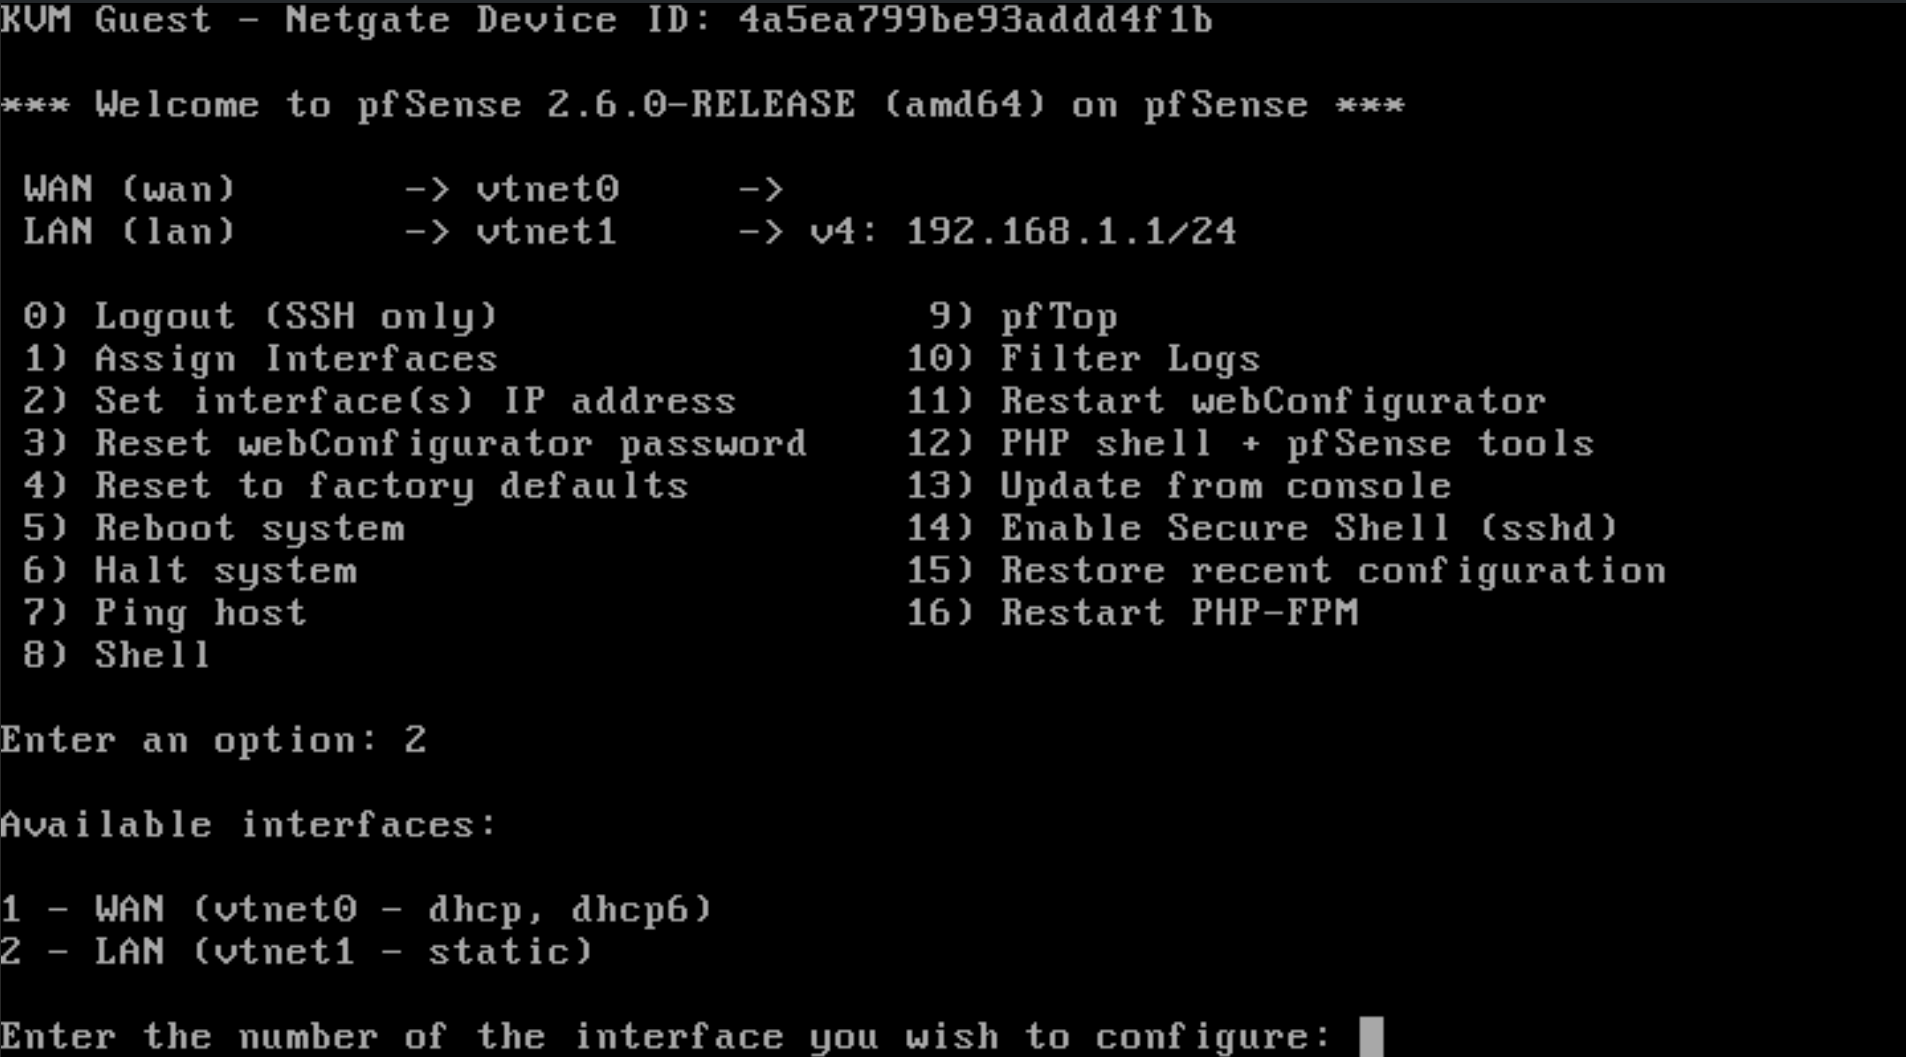
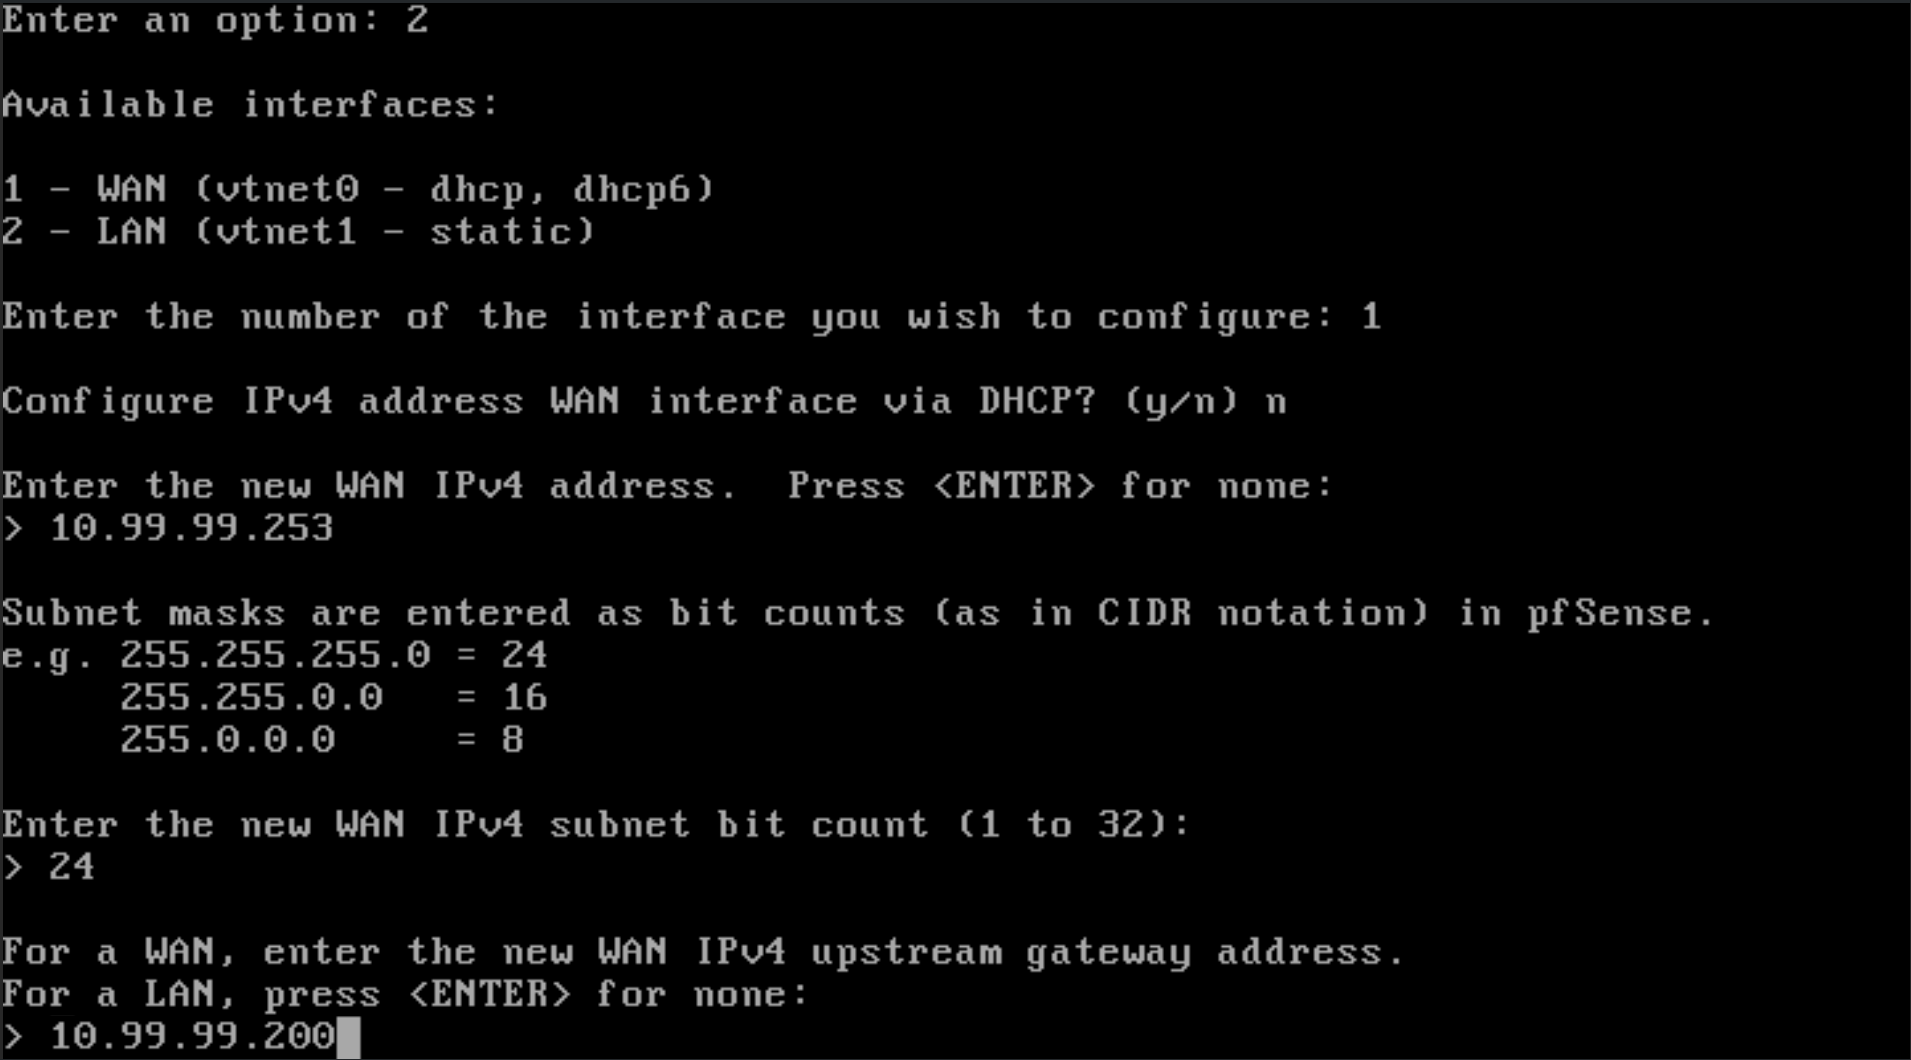
Choose option 1 for the WAN interface. It is currently DHCP, but we will need to assign the IP address manually. Choose "n" for DHCP and then type in the following IP 10.99.99.254

Choose 24 for the subnet

For the default gateway, we will choose 10.99.99.200
Select "n" since we want to avoid creating ipv6 on DHCP, and then press enter to skip creating an IP for the ipv6 interface. It will now apply your new settings.

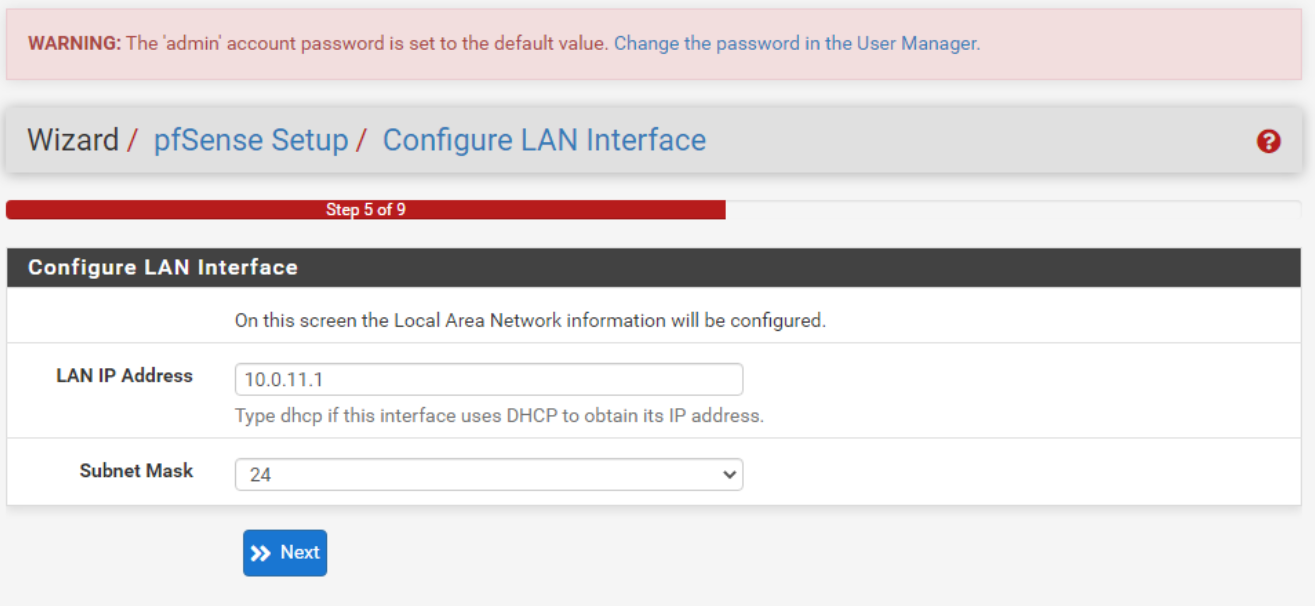
Now we will do the same for the LAN interface but type in the IP 10.0.11.1

Type in 24 for the subnet, press enter to skip the upstream gateway, enter to skip ipv6 IP and choose "y" to enable DHCP on the LAN interface

Now we will choose the DHCP range for this subnet, let's start with 10.0.11.100

and finish with 10.0.11.200

Press enter and then choose "n" we do not want to revert to HTTP as the webConfigurator protocol. PFsense will now configure this network.

We now want to have a VM with a desktop environment ready to access PFsense securely. I am going to use Windows 11, but you can use any VM with a desktop.
Open up your browser of choice and in the URL bar, type in https://10.0.11.1, and you will be greeted by the PFsense login screen.

Use the default Username "admin" and password "pfsense" and click sign in. You will be welcomed by the quick wizard to get started.


Keep clicking "next", even when you get to the WAN interface (we set this up already) just click next.

We have also already configured the LAN interface so just click next again
Now lastly, we can create a secure admin password

Click reload

Now we can click finish

You have successfully set up and configured PFsense!

Let's quickly check some settings to make sure that the devices on the LAN network can resolve DNS queries. Go to the top toolbar and select "Services" and then "DHCP Server".

Choose the LAN network and then scroll down to nameservers. Add the default Cloudflare servers and then scroll to the bottom and click save.

You can now configure PFsense to your requirements. As an example, you can now head to Firewall and then NAT to add some port forwarding.

Dark Mode 🌙
Go to the top toolbar, go to system then general setup

Scroll down to webConfigurator and for the theme choose "pfsense-dark"

Your eyes will now thank you 😄
